Tuesday 30 November 2010

The Mountain Pizza

Now this idea was inspired by a pizza i had in Arizona earlier this year, where they would stuff the base of the pizza rather than stuffing the crusts, giving a much deeper and 'meatier' pizza to bite into. By stuffing both the crusts and the base, each slice really does feel like an entire meal, and it can be a challenge to fit it into the humble oven, but i can promise you that it's definitely worth a try! Serves a small country (or 12 ravenous people).

Pizza Dough (for this pizza double the mixture..at least!)

  • Combine 375g strong white flour, pinch of salt and 7g dry active baking yeast in a large bowl.
  • Mix in 2 tbsp olive oil and 225ml of warm water, then leave the dough (covered) to rise for 20 minutes.
Construction
  • Pre heat the oven to 180C
  • Roll out just over half of the dough forming a giant base (approx. 18'') and transfer to a lined baking tray.
  • Spread a tomato sause base (i use passata) on the dough, leaving a large gap around the outside and top with grated cheese. Thinly slice strips of cheese and place around the tomato sauce circle in the middle, this cheese will form the stuffed crust.
  • Roll out the remaining dough to form a circle slightly smaller than the previous one, and place on top of the first base.
  • Then, taking the bottom base, bring the sides over the cheese strips and clamp onto the top base and continue around the pizza, forming the crust. If it doesn't hold in place well, brush over with a little egg or water.
  • Bake the pizza for 10 minutes. This allows time for the dough to cook a little and make sure the base stuffing won't get overlooked.
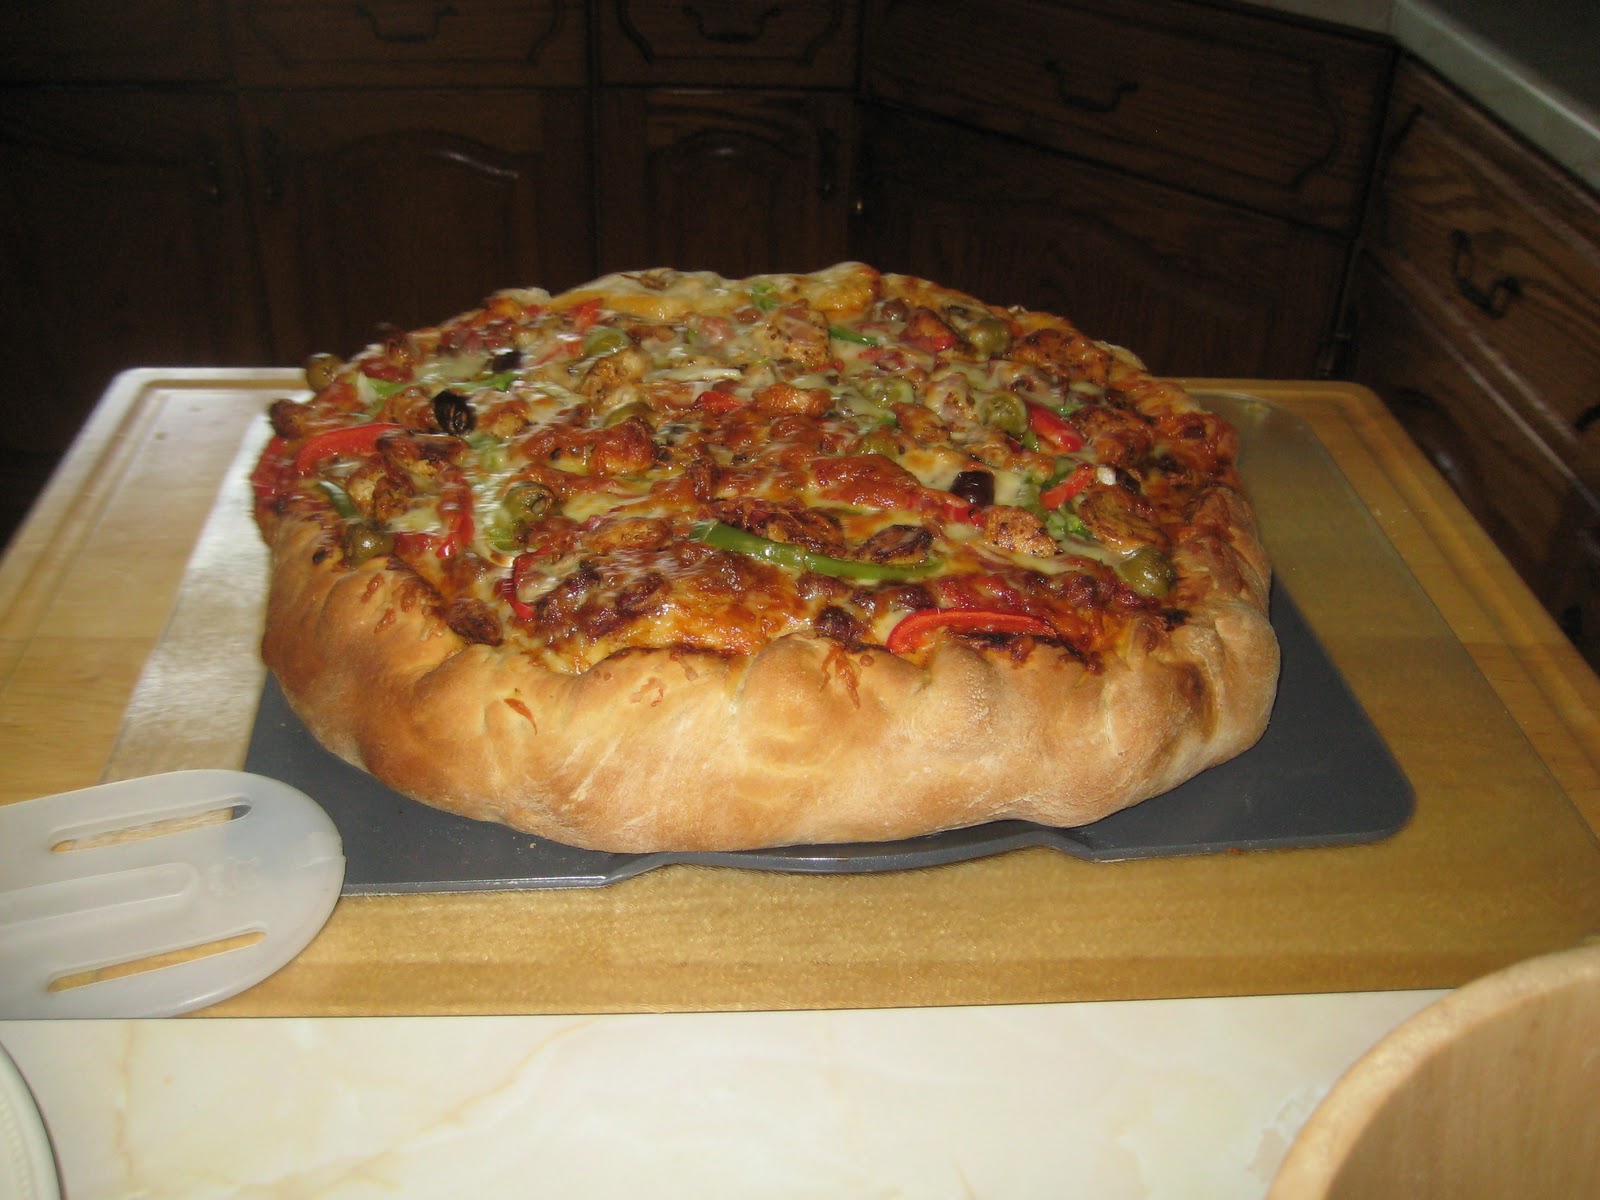
  • Now top the pizza as you would an ordinary pizza. For this particular mountain pizza, i used chilli con carne as a base topped with cheese, mushrooms, peppers, chillies, olives, chicken, pepperoni, tomatoes and more cheese, with a few herbs and spices thrown in for good measure!
  • Then depending on its size bake in the oven for around 20-25 minutes until golden brown and piping hot.

In the case of leftovers...served hot or cold this pizza makes a FANTASTIC midnight snack, lazy morning breakfast, or (and) packed lunch for work!


Monday 29 November 2010

Giant Cupcake Creations

About 2 years ago while my mum and i were rifling through Lakeland, we came across this huge cupcake tin, and couldn't resist buying it. Who wouldn't enjoy a giant cupcake!? Quick to test it out, we whipped up a batch of vanilla sponge then baked it according to the instructions enclosed...our fatal mistake!

According to instructions, you bake both parts in a low oven temperature of about 160 degrees C. (150 for a fan oven) for an hour to an hour and a half. Not a chance! The bottom of the cake part, holding more batter, burnt around the outside and was completely runny in the middle, while our top cake was nicely scorching. Seeing no other resolution we ditched the mixture (which was incredibly reluctant to part from the pan) and after several other failed attempts, we put the cupcake tin to the back of our cupboard, branded it utterly useless, and had no intention of future use.

Alas, who knew the cupcake tin would become so useful? My friends in the 6th form were eager to be experimented upon; to desire burnt cake with their enthusiasm says a lot about the school dinners they'd alternatively have to face to avoid starvation! My mum was also willing to give the tin one last shot, but this time around avoided the expert advice and tried our own methods. An hour later...out popped our cake!

The Armstrong's Giant Cupcake Baking Instructions

  1. Preheat the oven to 160C/325F/Gas Mark 3 and grease (very well!) the tin.
  2. Cream together 6oz butter and 6oz caster sugar.
  3. Whisk in 3 eggs one at a time, and gradually add 6oz self raising flour, 1tsp baking powder and 1tsp vanilla essence until light and fluffy.
  4. Pour around 2/3 of the mixture into the deeper side of the pan and bake for 20 mins.
  5. Then remove from the oven and pour the remaining batter into the other side of the pan. Bake then for 30 mins.
  6. If you find one side is cooking faster, secure some tinfoil over that side and when cooking it should prevent any burning!
18th Birthday 'Giant Cookie Cupcake'


16th Birthday cake with...
...mini rose cake 

Poulet aux 40 gousses d'ail


I feel garlic is a dietary necessity. A kitchen without garlic is like a disney film without a happy ending; it just won't do. This recipe certainly celebrates garlic in all its glory and makes a really great cosy winter supper. I prefer not to use a whole chicken as smaller pieces are easier to handle, but with a whole chicken, it would make a wonderful Sunday roast accompanied with some veg. Personally i would much rather tuck into the chicken served with some risotto and french bread to mop up the juices, but its versatility allows for plenty of imagination.


Ingredients

  • 3 tbsp olive oil
  • 8 chicken breasts (or drum sticks)
  • 1 sliced onion
    1 bunch of spring onions 
    fresh thyme
  • 40 garlic cloves left unpeeled (about 4 bulbs)
  • 3 tbsp dry white wine
  • salt and pepper to season

    Slightly browning the chicken
    METHOD
    Preheat the oven to 180C/350F/Gas 4.
    Heat the oil over a high heat in a casserole dish (preferably one that will fit all the chicken in one layer). Sear the chicken until nicely browned, possible done in two batches and transfer with the juices to a bowl and set aside.
    Few thyme sprigs extra just to make sure that flavour
    isn't missed!
    Put 20 of the unpeeled cloves of garlic into the casserole dish, and let cook for 5 minutes. These should so nice soft and give a fantastic sweet aroma. Top them with the chicken pieces, then cover with the remaining 20 cloves of garlic. These cloves give a crunchier texture to the dish.


    Add the white wine to the casserole. Sprinkle with the salt and pepper, and add a few more sprigs of thyme. Put on the lid and cook in the oven for a good 1-1½ hours.


    Basic Risotto

    1. Bring 1 pint of vegetable (or chicken) stock to simmering point on a low heat. In a separate, fairly heavy-based saucepan sweat 2 diced onions in butter for a few minutes until soft but not coloured. Add the rice (half a cup per portion) and cook for a further few minutes.
    2. Add a glass of white wine to the saucepan and cook the rice until almost all the liquid has been absorbed, stirring occasionally to make sure the risotto does not stick on the bottom of the pan.
    3. Add a bit of the stock and again wait until its absorbed; continue to add the liquid by degrees, until the liquid is all absorbed. For a creamier risotto, i like to add a dash of double cream and some grated parmesan.
    4. Stir in any desired herbs to the risotto (parsley, rosemary, oregano...) and season to taste with salt and pepper.
    5. The risotto should be served not piping hot, and i find it tends to cool very rapidly!

Thursday 25 November 2010

THAT birthday cake

You know the one...hours spent slaving away on a masterpiece that gets gobbled up in minutes.

I decided to make this one slightly special because, after all, it's not every day your little brother turns 16, so rather than the usual sponge cake conjured up last minute and fuelled with the idea that this very cake could compensate for my lack of a present, began designing my pièce de résistance.


The inspiration!
My brother is really into his sports, and i decided to focus on his kayaking, especially as i'd never seen a kayak cake before! Here presented the perfect opportunity to attempt a layer cake, with which i could decorate to make his little marzipan kayak (also named 'Hattie' like his beloved boat) appear to float down a cascading cake-ey waterfall. Simple.


If only! Why did i chose this occasion to experiment? The sponge itself is nice and simple (recipe included below). For basic cakes i usually use Nigella's victoria sponge recipe which is magnificently light and moist, but found that Peggy Porchen's recipe gave a much denser cake, which i would definitely need due to the amount of icing i was using. The cake is made up of 3 layers, so i recommend baking 3 sponges, although it can be made from two. The benefit of making it from 3 is that there is lots of extra sponge to spare, so if you're not an avid icing fan like our family, the sponge can be cut and covered and used for the decoration (although warn that this route is VERY time consuming!).


Basic Victoria Sponge
Makes three 8 inch baking tins or about 50 cup cakes

  • Preheat the oven to 200oC .
  • Cream together 400g butter and 400g caster sugar until pale and fluffy.
  • Slowly beat in 8 eggs and once combined mix in 400g self-raising flour.
  • Add a few drops of vanilla essence and spoon mixture evenly into lined baking tins and bake for around 12-15 minutes.

Buttercream frosting
Makes 500g

  • Beat together 250g unsalted butter and 250g icing sugar. 
  • Because you won't initially need it all, store in a sealed container in the fridge and bring back to room temperature before use.

If like mine, your sponges aren't perfectly level, it's essential that you cut the tops off them to make them nice and flat and even, otherwise once iced they'll be lopsided and ruin the whole effect. Then it's a case of covering them up with marzipan and Regal-ice. Ready-Roll is definitely the way to go. It's cheap and can be brought at most local store's and saves masses of time in the process.


My 3 sponges (the underside not quite so pretty!)
Sponge 1
Before covering, make sure this one is already placed on the base board, otherwise it's a pain to transfer once decorated and iced!
Cover in a thin layer of apricot jam (or any for that matter, and if it's quite thick still having just come out of the fridge, just add a few drops of water and pop it in the microwave to thin out) then smooth on top the rolled marzipan, and trim to fit. Brush with a little water and layer over the Regal-ice, smoothing out any air pockets as you go.
Sponge 2
You want to cut this one slightly smaller than the base cake, but not too small, otherwise the top cake becomes ridiculously small! Again repeat the process as above. To stack it on top of the other cake, i placed 4 cocktail sticks into the base cake and spread the base of the middle sponge with buttercream (recipe above), then pushed the cake onto the sticks, securing it in place.
Sponge 3
This one can be as small as you like, and the process of covering and stacking is the same as above. I found that the doubled marzipan and Regal-ice effect was a little too heavy and overpowering for the little top cake, so just cut a small marzipan disc for the top of the cake, rather than covering the whole thing.


All of this can be done up to 2 days in advance stored in an air-tight container.


Now, the fun part...
Chunks of sponge for the bigger rocks
the leftovers...

I started with the tree's and rocks, mainly because i was using the leftover sponge and didn't want it to become stale. The rocks (and trees for that matter) aren't too complicated, but take a while if you make a lot of them. Cut up small chunks in varied sizes of the sponge and for the trees cut triangles out. To cover them, i rolled out fondant icing (with plenty of icing sugar spare to avoid the inevitable stickiness!) and added black food colouring to one chunk and green to the other. When rolling them out, don't make the icing too thin because it will easily tare when covering the awkward shapes, which i frustratingly discovered time and time again! Add a little of the watered down jam to the sponge and cover them up. Use small dots of icing (icing sugar and a little water) to stick them to the cake. Then repeat about 30 times!


The waterfall/river is made from the buttercream. If you can, pipe in continuous lines bending and twisting down the cake. Because of the large drops form each cake section, i filled and smoothed them out first with the buttercream to make a smooth 'ramp' down the cake that i could pipe onto. To gain the colouring, dip a cocktail stick into blue/green colouring and gently trail down the icing, being careful not to push too hard.


I became a little obsessed by this stage and really went all out on the details, adding the little marzipan kayak with its paddle, making a 'bear cave' and popped a little marzipan bear poking out from the rocks, a little jumping salmon, and a sign. To get the detail such as paw prints and shading on the trees, you can buy icing markers (Dr Oetker do a reasonably priced set) and they draw onto the cakes a little like a paintbrush. 


So after a whole day (and a bit more..) spent in the kitchen and a horrible mess left everywhere, was it worth it? Definitely! It may get eaten quickly amongst a ravenous family, but seeing the final product can't fail but put a smile on your face, and your efforts will be appreciated!


Monday 22 November 2010

About me

Hello!
 I'm Meg, a 17 year old student, who has fallen in love with food and cookery and would quite happily spend an entire day in the kitchen, if only time would permit!

The Armstrong clan earlier this year!
Since a young girl my life has always revolved around food; initially inspired by my father's 'creative cooking' i was always loitering around the kitchen concocting creations of my own, and trying desperately to re-create his most prized recipes. My mother, being the head baker in the family, threw all of her art school wisdom into designing not only the most scrumptious cakes and pies but the most elegant and simply beautiful. I had a lot to live up to!

Being so tied up with school i rarely had the desired time to cook, so resorted to the odd family dinner or birthday cake, in between homework, coursework, sports practice, piano practice, college, driving lessons, etc etc...And it wasn't until i became seriously ill and had to pull out of college that i began to really consider working with food as a career path.

Alas, Meg Armstrong: the future Nobel prize winner in Quantum Physics was not to be! Rather than re-entering my A-Levels next year, i now plan to train as a chef, and have never been more excited. It's a far stretch from the likes of studying Physics at Cambridge University, but why should't we all be doing something we love in life?

Porthtowan...my local piece of heaven
When i'm not in the kitchen you're pretty much guaranteed to find me with a surfboard in hand down on one of the many beautiful beaches Cornwall has to offer. As a family we tend to re-locate a lot (Florida, California, Somerset..) but Cornwall has always felt like home to me. The fresh sea air and glorious countryside never fail to lighten my mood.

I'll add all my 'experiments' and some of my favourite recipes as i continue to learn and improve! I hope you enjoy reading my blog and please feel free to contact me!